JSON Web Tokens (JWTs) are commonly used by web applications as an alternative to traditional session cookies. This article focuses on security test cases that can be performed against JWT tokens using a test lab and popular open-source tools.
To ensure easy comprehension, we will first cover the basics of JWT tokens and how they function before diving into the test cases.
Table of Contents
What is a JSON Web Tokens and How Does It Work?
JWT tokens are widely used in modern development, primarily for authentication. They consist of a signed data structure and are extensively used in applications that rely on REST APIs. Since API calls require authentication, JWT provides a mechanism to verify each request.
A JWT consists of three parts: Header, Payload, and Signature. Each part is Base64 encoded and separated by a dot (.). A typical JWT looks like this:
eyJ0eXAiOiJKV1QiLCJhbGciOiJIUzI1NiJ9.eyJpc3MiOiJodHRwOlwvXC9kZW1vLnNqb2VyZGxhbmdrZW1wZXIubmxcLyIsImlhdCI6MTU5NzkwNTY1NywiZXhwIjoxNTk3OTA1Nzc3LCJkYXRhIjp7ImhlbGxvIjoid29ybGQifX0.rWCC59QiJrt7hCrQlZDv0ReiOt6ju06Dl9iayW4w174Breaking Down the JWT Structure
- Header (eyJ0eXAiOiJKV1QiLCJhbGciOiJIUzI1NiJ9)
- Specifies the algorithm used for signing the token.
- Example: HS256 (HMAC SHA-256)
- Can be decoded using tools like JWT.io
- Payload (eyJpc3MiOiJodHRwOlwvXC9kZW1vLnNqb2VyZGxhbmdrZW1wZXIubmxcLyIs…)
- Contains user information, access control details, and expiration time.
- Signature (rWCC59QiJrt7hCrQlZDv0ReiOt6ju06Dl9iayW4w174)
- Ensures token integrity and validates whether it has been tampered with.

Now that we have a good understanding of JWTs, let’s focus on security test cases.
Security Test Cases for JWT Tokens:
Setting Algorithm to None
A weak JWT token may support the “None” algorithm, allowing us to set the algorithm to “None” in the header and remove the signature part.
Note: This blog is written based on a lab, which you can refer to at this link.
Let’s look at an example:
Here is the actual token:
eyJ0eXAiOiJKV1QiLCJhbGciOiJIUzI1NiJ9.eyJpc3MiOiJodHRwOlwvXC9kZW1vLnNqb2VyZGxhbmdrZW1wZXIubmxcLyIsImlhdCI6MTU5NzkwNjcxMywiZXhwIjoxNTk3OTA2ODMzLCJkYXRhIjp7ImhlbGxvIjoid29ybGQifX0.BoLbpYwwxPC9xja_Oghat-KOjBgdFId2zl5kMt9Tk8oI am decoding the token using JWT.io, let us look at

See the Header section above—the algorithm being used is HS256. Now, let’s change it to None. We should also remove the third part (signature) while keeping the last dot.
Here, I am using the Burp extension called JOSEPH to achieve this.

The output token in the above screen is the token with the algorithm set to “None”. Notice that the signature part has been removed.
Now, let’s test whether this token is valid or not.

Click on Send JWT.

Huuhhhh! Our modified token is working! This confirms that the original token is weak.
Moving to the next test case
Provide a signature-less or invalid signature token and observe the response. If the server accepts it, then it is a vulnerability.
Changing the Algorithm from RS256 to HS256
Before modifying the token, let’s first understand the difference between RS256 and HS256:
- RS256 is an asymmetric algorithm that uses two keys:
- The public key is used to verify the token.
- The private key is used to sign the token (and is kept secret).
- You can extract the public key from any token using the OpenSSL tool, but the private key remains confidential.
- HS256 is a symmetric algorithm that uses only one key for both signing and verification. This key must be kept secret.
The Attack: Modifying RS256 to HS256
Here, we will:
- Modify the token’s algorithm from RS256 to HS256.
- Sign the token using the public key.
Why does this work?
- RS256 signs the token using the private key and verifies it using the public key.
- When we change the algorithm to HS256, the server mistakenly uses the same public key for both signing and verification.
- Since the public key is accessible, we can now forge a valid token.
Example:
Here is my modified token:
eyJ0eXAiOiJKV1QiLCJhbGciOiJSUzI1NiJ9.eyJpc3MiOiJodHRwOlwvXC9kZW1vLnNqb2VyZGxhbmdrZW1wZXIubmxcLyIsImlhdCI6MTU5NzkwODczNiwiZXhwIjoxNTk3OTA4ODU2LCJkYXRhIjp7ImhlbGxvIjoid29ybGQifX0.Fy1BYtslXhWrinxmpKyVOdAJvHjUQNjlXNKlTKqSIWbfk6KHwABVIKK4dcSB4Jt4p7RHmBfvTfb0TdGQWxDaDHWwPMsyIxHn0Ppxb9iXt4sfbvOUeMgNzTZyAbaAPFJrd-flbSUss5ejoEuQSN2YlTuKvGpjY7hXVFbLNI3fmq-Fsmct9tiyuLSmT7zr0q6xoJkQ0yOVsHKARz1UtixnyzLXUmQfCUGEZHrljGK05vfw_ZMkjegHLuBgQdpHAyxz2woPPJziURiY7yN3AqdKHk0m0_GQqlKdyuOt0Q43zjpAzksaubTKrE5hha88i86YohN5mmpRjAuiaMNrCMiwqwlook at Jwt.io
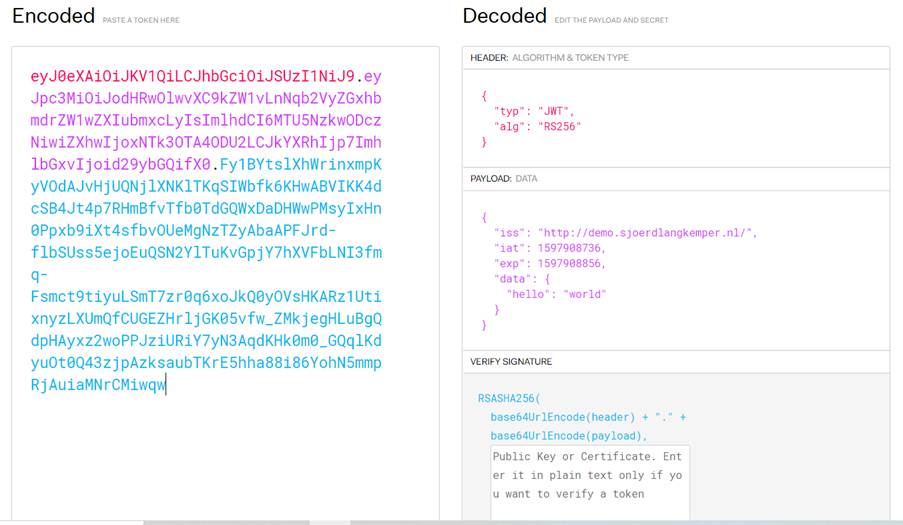
The token is using the RS256 algorithm. To test this case, we first need to extract the public key from the token.
Here, I am using the OpenSSL tool to retrieve the public key.
Step 1: Obtain the Server Certificate
To do this, run the following command:
openssl s_client -connect <hostname>:443
Step 2: Extract the Public Key
- Copy the server certificate and paste it into a file.
- I saved it as cert.pem (Make sure to use the
.pemextension).
- I saved it as cert.pem (Make sure to use the
- Run the following command to extract the public key:
openssl x509 -in cert.pem -pubkey -noout > key.pem
✅ Public key extracted successfully!

Step 3: Generate a Token Using the Public Key
Now, I will use a tool called JWT_Tool to generate a token by signing it with the extracted public key.
Note: Download JWT_Tool from GitHub and follow the steps below.
Run the following command:
python jwt_tool.py eyJ0eXAiOiJKV1QiLCJhbGciOiJSUzI1NiJ9.eyJpc3MiOiJodHRwOlwvXC9kZW1vLnNqb2VyZGxhbmdrZW1wZXIubmxcLyIsImlhdCI6MTU5NzkwODczNiwiZXhwIjoxNTk3OTA4ODU2LCJkYXRhIjp7ImhlbGxvIjoid29ybGQifX0.Fy1BYtslXhWrinxmpKyVOdAJvHjUQNjlXNKlTKqSIWbfk6KHwABVIKK4dcSB4Jt4p7RHmBfvTfb0TdGQWxDaDHWwPMsyIxHn0Ppxb9iXt4sfbvOUeMgNzTZyAbaAPFJrd-flbSUss5ejoEuQSN2YlTuKvGpjY7hXVFbLNI3fmq-Fsmct9tiyuLSmT7zr0q6xoJkQ0yOVsHKARz1UtixnyzLXUmQfCUGEZHrljGK05vfw_ZMkjegHLuBgQdpHAyxz2woPPJziURiY7yN3AqdKHk0m0_GQqlKdyuOt0Q43zjpAzksaubTKrE5hha88i86YohN5mmpRjAuiaMNrCMiwqw
you would get options like below.

Use option 3 and load the public key file as shown below.

Observe the screenshot above. We have obtained a token signed with a public key. Now, let’s check whether the server accepts the token. A vulnerable server will accept the token.
Next, let’s move on to another test case:
Cracking the Secret Key
As discussed in the example above, we already know that the HS256 algorithm uses a single key (commonly referred to as a secret key) to sign and verify the token.
Here, we will attempt to brute-force the token using available wordlists. Weak tokens often use weak secret keys, which can be easily cracked.
Let’s see how to do this. For this demonstration, I am using a tool called JWTBrute, as it includes a built-in wordlist. Alternatively, we can use JWT_Tool, but in that case, we need to provide our own wordlist.
Here is my token:
eyJ0eXAiOiJKV1QiLCJhbGciOiJIUzI1NiJ9.eyJpc3MiOiJodHRwOlwvXC9kZW1vLnNqb2VyZGxhbmdrZW1wZXIubmxcLyIsImlhdCI6MTU5NzkxMTYzMywiZXhwIjoxNTk3OTExNzUzLCJkYXRhIjp7ImhlbGxvIjoid29ybGQifX0.dprRg8uou4QevpJgBxfVkQPerAe0Ey9_TXHhLjYviWklet’s check the token using JWT.io.

Observe the screenshot above. The algorithm being used is HS256, which means it uses a single key to sign and verify the token. Let’s attempt to crack the token.
Run the following command:
echo secret | jwtbrute.exe <JWT token>You will obtain the secret key. Refer to the screenshot below for the result.

From the above, we can see that the secret key used to sign the token was “secret”.
Huuhhh! We successfully brute-forced the secret key and obtained a valid one.
Now, using this secret key, you can modify anything in the payload and sign the token again with the obtained key.
See below—I am using the retrieved secret key to sign the token.
Insert the secret key into the signature part and copy the token. Then, verify if it works.
As seen in the figure above, our token was accepted. The provided token is valid because we signed it with the correct key.
These are the major test cases we regularly use to test APIs.
Hope you all enjoyed the topic and learned some new techniques!
